Freebies!

Bloggin The Crafts currently has 64 followers. I have a goal to get that number to 100 followers! YOU can help me! Refer your friends and fellow crafters. When we get 100 followers there will be a crafty giveaway!
Showing posts with label Imagine. Show all posts

Friday, December 28, 2012

Note Card Set

This year I decided to make a personalized note card set for my niece.  I decided to use my Cricut Imagine for this project.  I did a print and cut to get several "K's" for her first name, Katie.  This "K" comes from the Teresa Collins Baby Boutique cartridge.  I then used the Imagine to print the pink paper to use as a background paper.

I used a plain black card stock that I had on hand and then cut the printed pink background paper slightly smaller than the black piece.  I then added some twine.  I used adhesive dots to offset the initial.  Once I had made 6 cards I added envelopes and made a box to present the gift in.  I used Kraft card stock for the box and glued an acetate square to the front so that you can see into the box.

The box was made from a cut in Tags, Bags, Boxes and More that I had resized using my Gypsy until I had it just right for a note card box.  If you'd like the exact measurements just leave a comment telling me what you need!

I liked how it looked but still felt like it needed a little something extra to finish it all off, so I tied the box with black hemp that I had in my supplies.

I really liked how this project turned out.  I think it makes a nice gift for someone and can see myself making more of these in the future.

Again, if you have questions or want specific measurements please just let me know in the comments section and I'll get that information for you.

Lori

Friday, December 21, 2012

Pencil Jars

I always struggle with what to give the male teachers at my childrens' school.  This year I decided that a personalized pencil jar would be good.  I had picked up these glass jars at the Dollar Store.  I think they're intended to be used as a vase.

To the plain jar I added a ribon at the top.  Since it was for a man I did a plain knot instead of a bow.


To personalize the pencil jar I used my Cricut Imagine and printable vinyl.  This was the first time I had used printable vinyl and I was really happy with how it turned out.

I used the stock images and filled it with the graph paper from "Notebook Doodles".  Then I used "Country Carnival" to get the last name initial of the two teachers.  I decided to change the colors a bit as well.

I did the print and cut.  The package of the printable vinyl suggests putting your blade at 2.  I didn't follow this, but used 3.  Next time I will follow instructions!  Two will be fine.  Setting it at 3 cut through the vinyl and the backing, which wasn't a huge deal.

I applied the graph paper image and then the initial.  Below you see a close up of the decal and initial.  It's a bit difficult to see, but the shape is flood filled with "graph paper" from Notebook Doodles.  (I know I already said that!)

I think these will be a nice gift for the male teachers.  Hopefully they will think so as well!

Go be crafty!

Lori

Friday, February 24, 2012

Imagine Card

First things first...this is NOT my original idea!  I found this, and thanks to Pinterest, not only was I able to find it again, but now that I've created my own take on it, I can give credit where credit is due!  You can see the blog post where I got inspired HERE.

My version isn't much different, really.  I needed some "Thank You" cards, so I adapted the design for that.

 I needed to make a lot, so I started with 12 of these.  A friend recently gave me a bunch of envelopes that her store was going to throw away, so I measured the envelope and made this larger card to utilize the free envelopes!  The base is Kraft card stock.  You can't really tell from the photos, but everything is adhered with ATG, except for the balloons, and they have one big fat foam dot.  It really looks cool, especially with the banner flattening out the strings from the balloons.
 The next layer is the cloud paper from Imagine Best Friends, as is the balloon image.  The white piece is one of the "stock" images that is on the Imagine.  The banner is from Enjoy The Seasons.  I basically just played around with sizes until I got the card to look the way I wanted it to.  I took some decorative scissors to the card above, while choosing to corner round opposite corners on the one below.
The sentiment is from Emma at My Creative Time's "Many Greetings" stamp set.  I thought "Thanks a Bunch" works well with the bunch of balloons!  Once I had the sizes figured out it was really easy to keep the Imagine printing and cutting the different elements while I embossed and stamped.  Love how simple the Imagine can make a project, especially when you need to create multiples of something.

Here are the sizes that I cut:

  • A-6 card (6 3/8" x 4 5/8" folded)
  • Cloud - 7.8
  • White section - 3.0
  • Banner - 3.0 (winter section of Enjoy The Seasons)
  • Balloons - ???  I forgot to write it down!  Oops!
As a side note, I did learn something.  I was experimenting with the banners to see which one worked best for the card.  Each season has a slightly different banner.  I had one sheet of cardstock, and after I would print and cut a banner, I would reload the paper and check the "Load Last" box.  The new image now jumps on the screen over to accommodate the item that was previously cut.  This doesn't really make sense when I read it, so give it a try and I hope you'll see what I'm talking about!

Thursday, February 16, 2012

Imagine Sympathy Card

 I used the Imagine to create a few quick sympathy cards.  I used Imagine More Cards to create this.  I split the image into layers and left off the text "hello".  I wanted to be able to stamp a sympathy message instead.  Plus, layering the image with some foam adhesive is a look that I generally like.

You can see both the inside and outside of the card from this photo.  I always like to do 2 cards at a time when I'm creating them.  The liner paper inside sets off the scallops.
This is a bit closer shot of the card front.  For some reason my Imagine did not cut ONE of the scallops along the top edge.  I did the card base a few times to see if it was a fluke or what.  I will have to call Provo Craft and let them know.  I don't know if that means I have a faulty cartridge or what, but I though it was really funny that it wouldn't cut ONE scallop!  Thank goodness I had an exacto knife handy!

Monday, February 13, 2012

Wall Art

My lovely niece (I have to say that...she might read this blog) asked me if I could do some wall art for her baby's nursery.  She found this frame on Amazon and had it shipped to me to work my magic.  I used a link to his bedding set at Babies 'R Us and decided that the Imagine Blast Off cartridge would be perfect for this project.
The letters are from Blast Off (Imagine).  I printed them in layers and used a dimensional adhesive between the top and middle layers.  Under each letter is just plain white cardstock, which is taped to the inside of the frame.  I thought about using a light pattern paper, but it took away from the letters, so I went with white.
 After all of the letters were done I thought it still needed a little something.  The bedding set is sea creatures, so I checked Create A Critter and found the adorable fish, crab, and seashell.  I used the Imagine to print and cut those layers, choosing papers from Blast Off to fill the top layers.

 Once again I used dimensional adhesive (foam squares) to give the critters a little added design.
This photo is blurry, but I wanted to show you how adorable the little crab is.

I hope Amber likes it and I hope it's a great addition to Brenton's nursery.  Can't wait to see him again and snuggle his cute little self!

Thursday, January 5, 2012

Family organizer


I saw something similar somewhere in the great internet universe.  I wish I could give credit to that site/blog/post, but I really have no clue where I saw this idea first.  The problem with seeing ideas is that I often forget before I ever get the time to actually replicate these amazing ideas!

While doing some Christmas shopping I happened to be in the frame section of Wal-Mart and saw these 8 section collage frames.  HEY!  I remembered there was a project for these.  So, I picked one up.  This is a standard 8-slot 4x6 photo collage from Wal-Mart.  I think it cost all of $5.

Fast forward to last night.  I was in the craft room, cutting some snowmen for my daughter’s classroom when the collage frame caught my eye.  I was suddenly inspired and knew that my Imagine machine was going to come to the rescue!

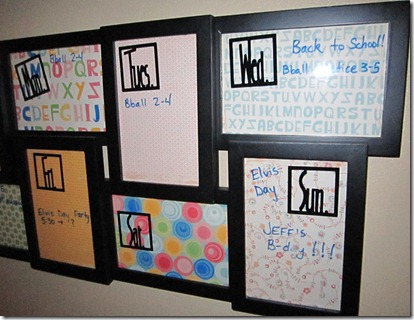
I chose the Hopscotch cartridge and used the “stock” 2:3 image, sized at 4.  I added 8 of those shapes and filled them with patterns from Hopscotch.
IMG_0878
Now I have the backing for each of the 8 holes.  I had to trim them a bit to fit and then replaced the frame backing. 

Next, fire up the Expression with Designer’s Calendar.  I did use the Gypsy to put all of the days as well as “Martin Family” on one mat.  I cut this out of vinyl.  Now, you may be wondering if there is a reason that I used the E to cut the vinyl instead of my Imagine.  Well, yes…I have only cut vinyl with my E, know the settings for perfect results, and it was 11pm, so there was no reason to waste time trying to figure it out on the I!  Plus, I could have the vinyl cutting while the Imagine was printing and cutting my backing papers!
IMG_0871
I applied the vinyl to the front of the glass.  If I make another one of these for a gift, I will reverse the image and apply it to the inside of the glass.  Other than that minor detail, I LOVE how this turned out!
IMG_0880
When you’re ready to write the week’s activities and appointments, take a dry erase marker, write on the glass, and then wipe clean for next week!  How cool is THAT? 
IMG_0881
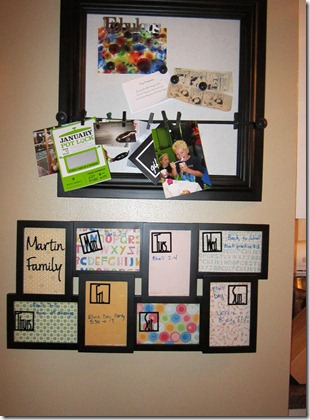
This is a perfect spot for our family organizer.  This is a little wall as you come inside of the kitchen.  The Creative Memories board hangs above it, holding a few photos and other assorted things (gift certificates, coupons, appointment cards, etc.).  The family organizer directly beneath works well because each of us pass this spot several times per day.  We can take a look to see what is coming up in the week, and it’s within easy reach for anyone that needs to add an event, including our 5-year old. 

DH even liked this project!  I said I might change the papers out for Valentine’s Day or other holidays.  He even suggested putting someone’s photo in the slot when their birthday or other important event was coming up.  Maybe he said that since Sunday is Elvis Day and DH’s birthday also!

Hope you enjoyed this project.  The Imagine made it so quick and easy.  You could get papers from a paper pack, or anywhere in your stash.  I love it that I was able to easily print off 8 papers that I know coordinate beautifully with each other.  It’s easy to change out for a new look, whether seasonally or for a special occasion.
Lori

Friday, December 23, 2011

Snowman Card

I am beginning to wonder if I'm obsessed with this cute little snowman from the Imagine "Enjoy The Seasons" cartridge!  He keeps popping up in my projects!


The base of this card is Kraft card stock cut to an A2 size.  On top of this I used a piece of blue paper that I had on hand.  This piece is 4" x 5.25" and then run through the Cuttlebug using a snowflake embossing folder.

I needed to do several cards so I sized the snowman at 3 and used auto fill to get 9 on the page of 12" x 12" white card stock.  The snowman is from page 20 of "Enjoy The Seasons".

Cute, but he needs more...so I decided to add a sentiment at the top!  My Creative Time to the rescue!  I used the banner dies from the "Build A Banner" kit and stamped "Merry Christmas" from the "All Around Christmas" set, also from My Creative Time.

Let me say, first of all, I do not get paid or even get a discount to endorse any products on my blog, but I LOVE the MCT products!  The dies are incredible...clean, and crisp images...simply amazing.  And the stamps...well, the stamps are awesome.  They always stamp a clean image (even with my amateur stamping skills).  I really enjoy the My Creative Time products and I'm so thrilled that my hubby got me a gift certificate for Christmas!

I punched a hole in the banner, added a little twine tie, and we were in business.  I adhered the snowman and the sentiment with foam squares to make them stand up a bit.
And, the best thing about this card?  Well, you can make several in little time!  I hope you enjoyed this project.  I had fun making it!

Tuesday, December 20, 2011

Quick Gift Bag

Here is another quick gift bag that I threw together.  I started with plain Kraft and white gift bags.  I pick these up at Big Lots or Hobby Lobby when they're on sale.  I like to keep these on hand, because you can decorate them for any occasion.

For this image I used the Imagine "Enjoy The Seasons" cartridge.  This tree can be found on page 22 of the handbook.  I cut it at 4.7 and used "auto-fill" to get 6 to a sheet of 12x12 white card stock.  I used the print and cut function.

Then I cut a piece of yellow paper that I had in my stash.  These rectangles were cut 4" x 6".  The printed image is mounted on the yellow image and then the entire thing is adhered to the gift bag.

Here are 2 of my gift bags.  They're not the fanciest gift bags I've ever seen, but they're OK!  They were quick to make.

Friday, December 9, 2011

Gift Bag

Today’s project is a QUICK one! I needed to get a couple of gift bags ready and I didn’t have much time. This was 30 minutes or less from the time I walked into the craft room to the time I walked out with the finished gift in hand! True Story!


gift bag


**Again, I apologize…pictures with the cell phone aren’t great, but it’s the best I can do right now and I figured a post is better than none!**


Recipe:


  • One plain gift bag

  • Snowflake image from Cricut Imagine “Enjoy The Seasons”

  • Background paper (green) from stash

  • Sentiment stamps from CTMH (these stamps were part of my Art Philosophy bundle)

  • Foam dot adhesive

I think the snowflake image was cut at 4.8. I started at 5.5 and then backed the size down until I could get 2 on my 8.5” x 11” cardstock!


gift bag 2


Here is the finished product! Way better than handing them a plain, white bag, I think!


gift bags


Hope you find some creative inspiration today! Have a great day!


Lori

Wednesday, December 7, 2011

Snowman Card

I bought the Imagine “Enjoy The Seasons” cartridge. This is my first project with it. So far I am liking it! I made 6 of these cards, with the basics being the same, but changing small details.


I started with a cream cardstock A2 card base. The snowman and the background paper are printed and cut from the Imagine “Enjoy The Seasons” cartridge. The scalloped circle and white circle are from the My Creative Time die set called “Scallop & Stitched Circle” set. I love the My Creative Time products! The sentiment is from the “All Around Christmas” stamp set that coordinated ever so beautifully with the die set! How cool is THAT?


snowmen


I adhered the snowman using foam squares to pop him off the paper a bit. The sentiment says “Cold twigs, warm heart”…how cute is that?!?!


Card Recipe:


  • Snowman from Imagine Enjoy The Seasons – cut at 3.0 (you can auto fill 6 of these on an 8.5” x 11” piece of white cardstock!


  • Background paper – use 8.5:11 stock image and fill with pattern from Enjoy the Seasons – 7.6 size with paper size set at 11 (width) and 8.5 (height). Cut this piece into 4 pieces, which will be 5” x 3.75”


I ended up liking this one the best:


snowman


I liked the double strand of twine. I tried several versions (single strand of twine, ribbon, nothing, etc) and I liked the double twine the best. If I make up 6 more of these I will stick with this design.


Hope you enjoyed it! Until next time….


Lori

Saturday, December 3, 2011

Imagine Card

It’s been a long time since my last post. I apologize. I’ve been crafting but haven’t been taking pictures or posting. I’m back! Sorry for the crummy photos, but my camera is not available so I used my cell phone. I figured a mediocre photo was better than no photo!


This project is a card I made using the Imagine. Sometimes that machine just makes things SO much easier! No choosing paper…no over-thinking…just choose your stuff, print and cut, and there you have it! I wanted to use a butterfly, but wasn't having much luck. I went to www.mycutsearch.com and searched "butterfly". Voila! I was in business. If you're a Cricut user and you don't know about that website, CHECK IT OUT! Amazing!


Like I said, I needed some sympathy cards. The image is from “Imagine More”. I used the layers so that I could delete the text that was included. Plus, I thought it would be prettier and more interesting to have the card dimensional. Once I printed it I thought the blue oval would be a perfect spot to stamp a sentiment. The background paper is a print and cut from the Imagine, flood filled with a pattern from the same.

sympathy2


Now, once I had made a few of these, I thought that the card would be good for many different sentiments. So, I stamped a different sentiment on this one.


ovation


I love it! Cute card…adaptable for many things…and quick to make! Hope you enjoyed it!


Card recipe:


Image from Imagine More – cut at 3.0 (layers on, remove text)


Background paper a 5:7 rectangle from “stock” images on Imagine – cut at 4.0 – filled with Imagine More pattern


Twine


Adhesive foam for dimension


My Creative Time sentiment stamps


sympathy_ovation


Like I said, really easy project and I think they turned out really well. I will be back on Monday with a project using the Creative Memories 'Tis The Season cartridge!


Lori

Saturday, October 1, 2011

Male Birthday Card

I have been having trouble creating “male” birthday cards recently. I picked up “Block Party” but had not cut anything with it. When I saw the grill it made me think of two of my brothers, because they both enjoy grilling. Today I figured I’d try the grill and see if I could use it for a birthday card.


008


The two cards are basically the same, but on the one above I cut the grill at 3.5”. The one below is 4”, and I think that just worked out better for the card. The cloud paper is from Imagine Hopscotch and the grass is from Plantin Schoolbook. I used two circle punches for the sentiment tag, while the stamp itself is from My Creative Time. I used some Stickles to jazz up the “smoke” and added a few dots of Stickles on the grill itself.


007


I attached the sentiment with a brad and did some stitching with a white gel pen. I also took a dark green pen and did some lines on the grass. It’s not my favorite part of the card, but it also wasn’t horrible!


Since my brothers live so far apart (one in Illinois and one in Oregon) I figured it was safe to send them similar birthday cards. Hopefully they don’t discuss that kind of stuff!


Hope you enjoyed this project. Do you have a hard time creating cards for men? Let me know your thoughts!


Lori

Thursday, September 22, 2011

Birthday Card

Just a quick post with some (poor) photos I took of a few quick card I made the other day. I will hopefully get back to my regular schedule of blogging on Monday, Wednesday, and Friday.


This card was created with the Imagine. The images are from Art Philosophy and I filled them with “paper” from the Ancestry Imagine cartridge.


bday3


I normally make 2 versions of the same card when I use the Imagine if I can fit it all in on one page. It seems like a waste to not print/cut as much as I can get on a page.


bday2


I stamped “Happy Birthday” inside of the first card, but thought it looked good outside on the second. The first one I ran the top layer of the butterfly through the Cuttlebug to give it some texture. On the second I used some Stickles to add some detail.


bday3


I like how both of them came out. The paper for the base of the card is some paper from my stash…not sure but it might be a Bazzil pack I picked up cheap at Big Lots. The rest of the paper is from Imagine’s Ancestry. No guesswork there…they all go together!


Hope you have a crafty day….I am hoping to get into the craft room this weekend and get several projects done so that I can get my blog posts back on schedule.


Lori

Wednesday, August 31, 2011

Button Card


First of all, let me say that this idea is TOTALLY not mine! I saw a similar card on a blog and loved it. The blog that I found this inspiration is “The Paper Boutique”, which can be found at http://paperboutique.blogspot.com. Check this blog out…she has great projects! I get a lot of inspiration to craft from her! If you read my blog you know I’m a fan of the A2, so I worked the general idea from that blog to fit my favored A2 size!


I started with a card base, cut from light blue cardstock. I used the Imagine to print the yellow layer, the blue layer, and the flowers. The flower itself is from the Snow Angel cartridge. I flood filled that with a print from Hopscotch. The yellow and blue layers are also from Hopscotch.


For this one I printed off 18 flowers and then printed four sets of the blue and yellow squares. Instead of taking the time to figure out how to get the size right on the Imagine, I just printed the squares at 5.3” and 5.0” and then trimmed them down.


Take the card base, and trim down the yellow printed layer to fit. Do the same for the blue solid layer. I used some buttons from my stash and glued those to each flower. I used a pop-dot type adhesive for the flowers. The card was lacking something, so I attached another button in the middle and did some doodling with a white gel pen.


The space at the bottom of each card is for a stamped sentiment. I can even layer a rectangle of the flower print with a yellow rectangle and then stamp on that. Once I do that and stamp, I’ll post a picture so that you can see how they ended up turning out!


I ended up making 4 of these total. I liked how they turned out and think once I stamp a sentiment on them they’ll be even cooler.


button cardbutton cards


I hope you enjoyed this project! Go make something!


Lori


Thursday, March 24, 2011

Easter Egg Card

I wanted to finish up one more Easter card project to add to my contribution to the Cards For Soldiers project. I saw an egg shaped card on someone’s blog and was able to create the egg shape using my Gypsy and the Designer’s Calendar cartridge. From there I created a smaller egg shape for the top. I made these cuts directly from the gypsy.

Egg cards

egg cards 2

For the design I thought the bunny from Kate’s ABC’s would be cute. Unfortunately, time was a factor so the Imagine was my hero! I used Kate’s ABC’s and pulled in the layers. I used the Imagine Blossom cartridge for the fills. Once I had that done I made all of the layers 2.5 (relative) and then used the Auto Fill so that I ended up with 4 full sets on the one page.

bunnybunny and outside

Print and cut and there you have it! I didn’t have to search for the “just right” shade of paper. I just let the Imagine do the work, which was a great time saver on this project. You can see from the photos that I did not do all 6 cards the exact same way. I kept tweaking it to try and get it just right. I think the one I liked best was with the blue ribbon tied on the front. Had I had more time I would’ve cut some of the “top” eggs in a solid, embossed it and then put the bunny on the front. I may try that for some Easter cards for my own use!

I really like the shaped card. The gypsy made it really easy to do. If you need instructions on how to do this, please comment below and I will post full instructions. I have heard of people sharing Gypsy files, and although I have not done this yet I’d be happy to give it a try if anyone wants the file.

That made 6 fairly quick cards to add to the CFS bundle. I need to box it up tonight and send it tomorrow. I have 70 cards to donate this time (see below). If you’re interested in this project, check out the “Cards For Soldiers” section of the Cricut message board! If you need a link let me know and I’ll be happy to direct you there.

CFS1

Happy crafting!

Lori

Tuesday, March 15, 2011

Thank You card

I used the Imagine to make a quick Thank You card. I decided to go ahead and print and cut 2 of the image that I chose so that I could try 2 versions of the card. It’s always good to have a back up Thank You card on hand, right?!?


I got the image from the Better Together Imagine cartridge. The card base and pink background are papers out of my stash that I chose after the “Thanks” image came out of the Imagine. It’s easier to match the colors once you see the print!


I ran the pink base through the Cuttlebug for some texture. Then when I laid the “Thanks” on there it just looked too plain, so I grabbed the twine and added that for some extra accent.


Keeping in my Stickles frenzy I used those to add some sparkle to the card. I went gold for one and diamond for the other…each have their own appeal.


thank you card 2Thank you card


This was a fast project to put together. If nothing else, the Imagine makes it possible to do a quick project. I (thankfully) have had NO problems with my Imagine. Some of the posts I’ve seen on different message boards are really scary. I don’t know if I got lucky or what, but I am really happy with mine. Don’t get me wrong, I still love to sit down and hammer out a project using the Expression. That machine is great. But, when I need a quick card and I don’t have time to do a lot of layers, the Imagine is perfect. I hope to play with the features of the Imagine more and more and start getting some more complicated projects done to share.


Go forth and craft….


Lori

Birthday pop up card

Well, I decided to try my hand at a couple of new things. First of all, I designed a card in my Gypsy and I used the Imagine application. THEN….as if that wasn’t crazy enough (ha ha) I decided to make this one into a pop up card.

The Gypsy layout with the Imagine was no problem at all. I thought it was pretty straight forward…just like using the on-screen Imagine. I wish the Imagine application for the Gypsy was more like the Cricut application and we could move stuff around, but it’s not so I’m not going to dwell on it! Some of these folks spend a lot of time being mad!

birthday card

I used the sentiment from a cricut cartridge (can’t remember which one) and then used the Imagine Better Together to fill the image with color. I think that’s a great feature because you can coordinate your sentiment with the colors/patterns of the Imagine image that you use.

birthday card inside

The inside of the card is the butterfly and flower from Better Together (Imagine). I printed them in layers and then used a dimensional adhesive dot to make them pop out a bit. I had directions for the pop up card but I just kinda winged it. I was in a hurry and didn’t want to read directions. One mistake I made is that I should’ve put the pop up image a little higher on the pop up mechanism. But, it works, so I’m going with it!

birthday card inside 2

I just found Stickles, so I am a bit of a Stickles freak right now! I am bling’ing everything right now.

I am hoping to try out the pop up cake card and the waterfall card this week. The kids are on Spring Break and it’s raining. I hear tales of warmer weather coming this week and I am anxiously awaiting said weather!

Have a crafty day….

Lori

Saturday, March 5, 2011

Birthday Card x 2

This weekend my two kids have 3 birthday parties to attend. Great excuse to get to the craft studio and make some cards!

My son requested a giraffe for one card and then a cat for the other. However, the cat card was for a girl in his class, so I took the opportunity to use the new Imagine cartridge and make the cupcake one. Ugh…it is so freaking cute! I just love it!

Giraffe bday card

The giraffe is from the Create A Critter cartridge. I used the Imagine to print and cut so that I didn’t have to dig up paper. The brown background paper was run through the Cuttlebug. I think this card turned out well. I used a card blank that I had in my stash for the green base card.

Cupcake happy birthday

This one turned out so cute! I love it. (wait…I already said that…) Anyway…the Cupcake is from the Imagine Better Together (I think). The “Happy Birthday” is from Create A Critter. Both were printed and cut on the Imagine. The background paper was run through the Cuttlebug. I used Stickles to give the card some sparkle.

Hope you enjoy! I had fun making these two projects.