Freebies!

Bloggin The Crafts currently has 64 followers. I have a goal to get that number to 100 followers! YOU can help me! Refer your friends and fellow crafters. When we get 100 followers there will be a crafty giveaway!

Wednesday, January 16, 2013

Dollar Store Craft - Pill Container

Today will be my last post, here at Bloggin' The Crafts.  I have decided to start a website and combine all of my bloggy blogginess into one spot.  (Yes, I made those words up, but it's my blog, so I'm allowed to make words up).  This is the last post you will see here at Bloggin' The Crafts.  Now I'm sure some of you are sobbing right now (ha ha), but do not fret dear friend!  I am not gone forever.  You can now find me at.....(drumroll please......)

Chaos and Craziness

Here you will find all of the crafty inspiration you have come to love at Bloggin The Crafts plus recipes, health and fitness posts along my weight loss journey, and general ramblings as I try to manage the chaos and craziness that is my life!  Things are still being developed over at Chaos and Craziness but I'd love for you to check back several times a week.  I hope to have a "follow by e-mail" widget installed soon so that you can get reminders when I publish a new post.

Now, with no further ado...my last post at Bloggin' The Crafts!

Dollar Store Craft - Pill Container

Yes, that's right...PILL CONTAINER.  Now, before you shake your head and think "I don't need a PILL container; I'm too young for THAT"...hold yer horses, Missy!  This pill container isn't for pills.

It's for appreciation.

That's right...appreciation.

I saw this idea HERE and I thought that it was a CUTE and FUN idea that I must try...asap!

Now, the project linked to above is geared toward a spouse, but you could TOTALLY adapt this for your kids, a friend having a trying week, heck...even a teacher for teacher appreciation week!  (...ding... light bulb moment...)

My hubs really likes "Good and Plenty" candy, so I used that and Starburst candies for my treats.  I printed the notes on card stock and folded them up for the pill container.  I loved the one that I found at the dollar store because it's HUGE!

This is really a quick and simple craft.  You can even print off the "notes" from the link above, or take a minute and create your own.  This isn't a HUGE opening, so a little candy with the note and it's a done deal.

There's mine...all filled up and ready to go!  I'm going to put it on the hubster's nightstand tonight so that he can start it tomorrow.  Nothing major, just a fun little reminder of "hey, I like you...even though we haven't had conversations about much except sick kids and work stuff lately....I like you, and I appreciate you".  We all need to hear that every now and then, right?

With Valentine's Day right around the corner this is a fun and quick craft the you can make for someone that you care about!

Monday, January 14, 2013

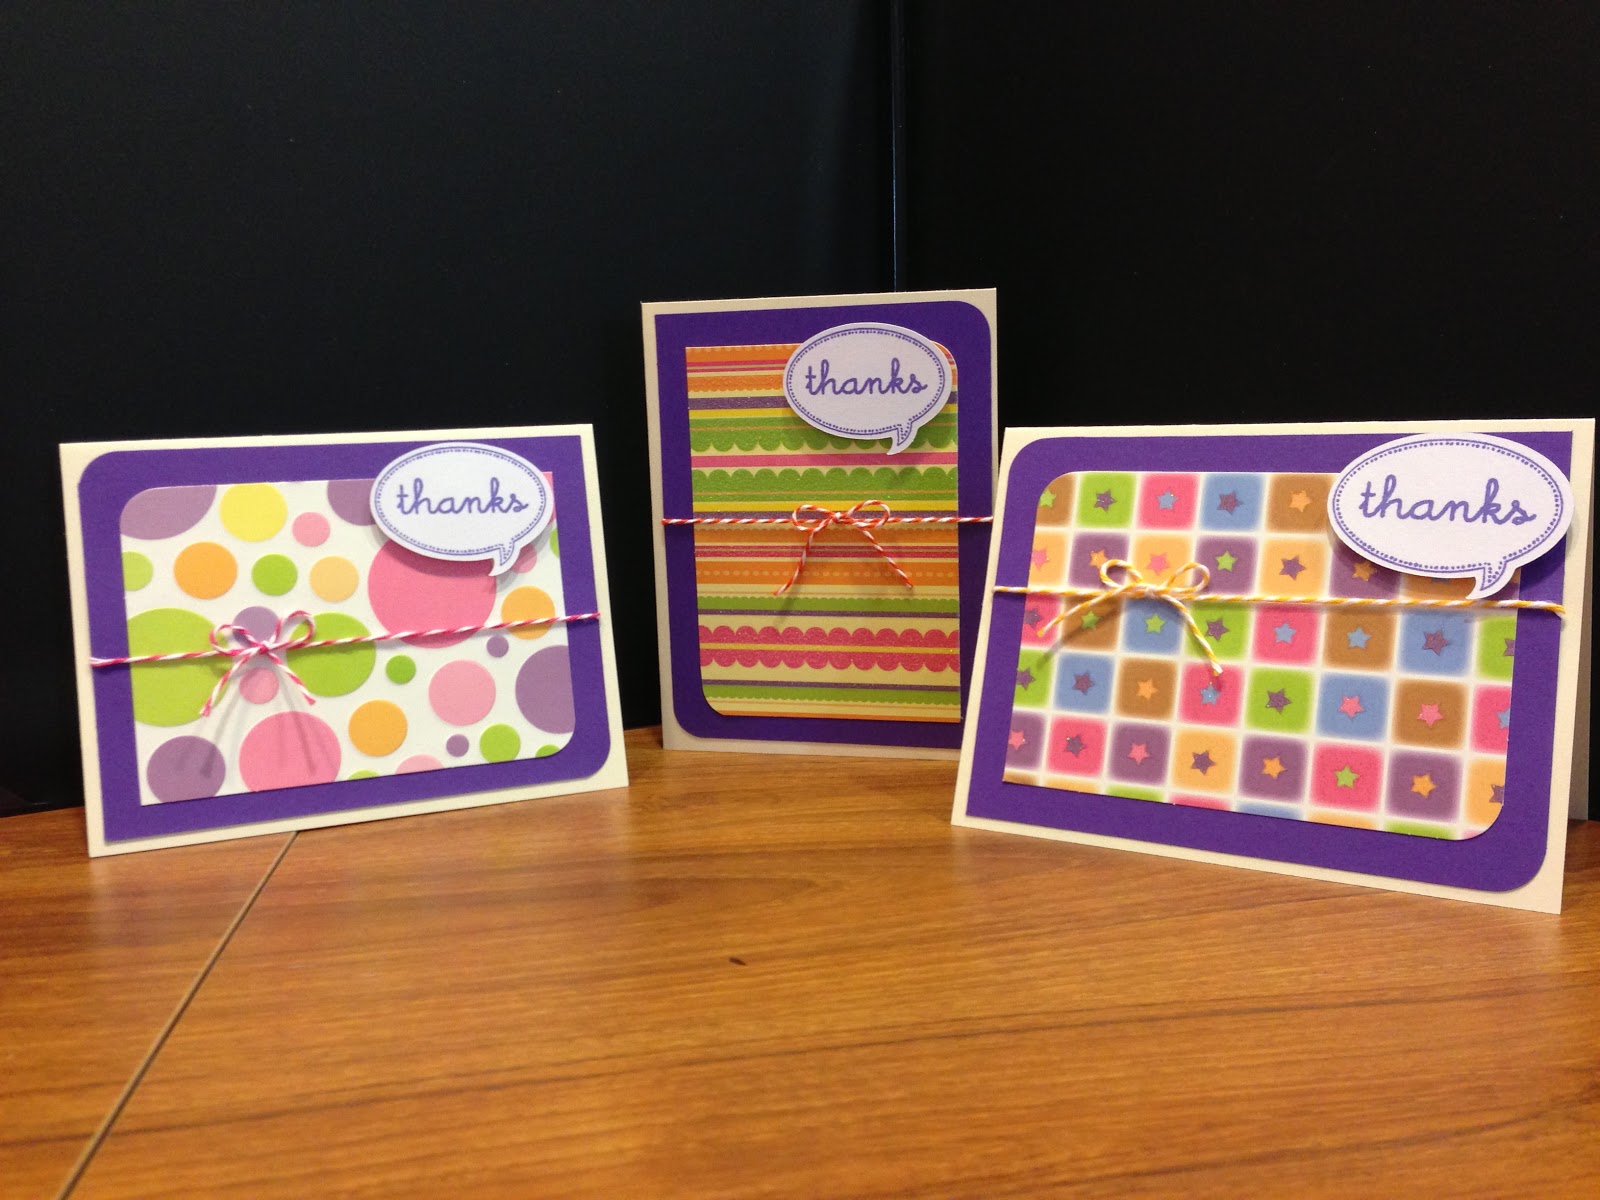
Thank You Cards

It's winter, but some times I find it important to shake off those winter blahs and throw a little color into the craft projects.  These cards are so colorful and fun they just make me think happy thoughts and sunshine!


I used a cream card stock base and then the same purple paper for all of the cards.  I changed up the pattern paper, using a stack from my stash. I'm not sure why, but I have become really fond of rounding opposite corners and leaving 2 corners normal.  I really like the look of that.

The sentiment stamp is from CTMH and it's one that coordinates with the Artiste cartridge.  I cut a page full of the bubbles (cut at 1 1/2" per the stamp sheet) and then stamped them while they were still on the Cricut mat.
CTMH and Cricut teaming up together on these cartridges (Artiste and Art Philosophy) are a GREAT thing for crafters, if you ask me!  I love both of the cartridges and how they coordinate perfectly with the stamps.

Once I had all of my paper cut and sentiments stamped it was assembly time!  The set of 6 similar cards went together really quickly.  I added twine for a little extra color and called it a day.


Now I need to get busy and use these beautiful cards up and send out "thank you" cards for Christmas!  I've let that get away from me and I need to get on it!

Do something crafty today!

Friday, January 11, 2013

Get Well Soon Card

One thing I have seen many bloggers mention is that they have difficulty making cards with a more "manly" feel to them.  Recently my husband asked me to make a get-well card for a friend who has been dealing with some health issues.

Last night I tackled the project.  I used a card blank from my stash.  I cut a black piece of card stock and ran it through the Cuttlebug to emboss the paper.  I then cut a piece of white card stock and corner rounded two of the corners.  I stamped the dice and sentiment using My Creative Time stamps.    I decided to stamp off the paper to add lots of dice.

I adhered the white paper to the black and then decided I'd tie some red hemp around the black piece. I then added a piece of washi tape to the black section.


I rarely do anything to the inside of a card, but since this card is red I thought it would be nice to add a white piece inside.  I rounded two opposite corners and then stamped the sentiment "Thinking of you" from a MCT stamp set.


I like how it turned out...simple, but elegant.  Hopefully he likes it and knows that we are thinking of him and wishing him good health in 2013.  

Wednesday, January 9, 2013

Dollar Store Crafting - Liquid Soap

I saw this on a blog I follow that LOVED it!  What a wonderful idea!

First find clear liquid soap at the dollar store...you know, so that it's a Dollar Store Craft!  Remove the front and back label and then use "Goo Gone" or some other adhesive remover to get the sticky gunk off.  This is the hardest part, I promise!

Take some acetate and cut it to a size that will fit in your soap bottle.  You must use Stazon ink for this to work!  Ink up your stamp with Stazon and then stamp your acetate, being very careful to NOT MOVE the acetate.  I found it helpful to put the acetate on a sticky Cricut mat to keep it still!

Let the image dry.

Slightly roll up the acetate and put it into the soap.  It will open up as you push it down into the bottle.  Then put the soap pump mechanism back in, situating it so that the pump is behind the acetate.


Decorate the outside of the bottle with fun stuff from your stash!  There you have it...a fun and easy craft that won't break the bank!

Lori

Monday, January 7, 2013

Soup Recipes

Sorry I'm a bit late with today's post.  I am under the weather, which stinks.  My daughter is also ill, making for a not-so-fun household of late.


I have been on a soup making kick lately.  There is nothing quite as satisfying on a cold day than warm soup!  I think that broth made from boiling a carcass is the best flavored broth and makes the best flavored soup.


I tend to use a recipe as a guide...and change things up to make the recipe my own.  Last week I made both broccoli cheese soup and tomato soup, both of which I thought turned out really well.
For the broccoli cheese soup I found a recipe in one of my cookbooks and a recipe online that I used as my guide.  Here's what I did!

Broccoli Cheese Soup:
Chop one red onion.  Melt 1 stick of unsalted butter in a large saucepan.  Add onions and cook until onions are tender.  Add broccoli.  I had broccoli in my refrigerator that needed to be used.  I would estimate I used about 2 1/2 stalks of broccoli. Stir the broccoli in the onion and butter mixture.  Cover this with chicken broth.  Let that simmer until broccoli is tender (I cooked mine for about an hour).
Blend (in batches) the soup using your blender.  Don't add too much at a time!  I usually filled my blender about 1/2 way full, and blended that.  Be careful blending hot food/liquid!  Blend in batches until all the soup has been blended.  Return the blended soup to the saucepan.  Cube 1/2 of a loaf of velveeta cheese.  Add the cheese to the soup, stirring constantly until the cheese is melted and blended in to the soup.  Let the soup simmer.  Just before serving, stir 2-3 tablespoons of cornstarch into 1/2 cup of milk.  Add this to the soup, stirring constantly until soup thickens.  Season with salt and pepper to your taste.


Tomato Soup:
Chop two onions.  Heat a few tablespoons of olive oil in a large saucepan and add onions.  Cook until onions are tender.  Add 4 cups of chicken broth, 1 large can of whole peeled tomatoes and 1 smaller can (soup can size) of fire roasted tomatoes.  Stir in 2 tablespoons italian seasoning and pepper.  Simmer for 1 hour.  Blend soup in batches (like you did with the broccoli cheese soup).  Return blended soup to saucepan.  Add a pinch of sugar.  Cook and stir with the lid off to reduce down a bit.  Serve the tomato soup with some freshly grated parmesan and croutons!  Yummy!

I hope you enjoy the soup recipes!

Friday, January 4, 2013

Note Card Set

I must admit that I really enjoy making note card sets.  I think one of the things I enjoy about the Cricut is that you can make multiples of a project easily, so note card sets can be made fairly quickly.  I find the thing that takes me the longest is simply figuring out WHAT I'm going to do!  Once I know that, it goes together really quickly.

Today's note card set used the CTMH Artiste cartridge.  I know I've said this before and I'll probably say it again, but I LOVE how the cartridge works with their stamps.

For this project I decided to use the Cricut Artiste Collection Word Balloons stamp set by CTMH.  I really liked the "hello" stamp.  CTMH makes it really easy, and prints right on the stamp set 2" p.65 next to the stamp, so you know that this particular image can be found on page 65 and you're going to need to cut it at 2".


It's hard to see in the photo above, but at the top right of the stamp you can see the size and page number.

I loaded a piece of 8.5" x 11" white card stock into my Expression and chose the image.  I set the cut area so that the machine knew I was using the smaller paper.  I then hit the "Auto Fill" button so that the machine would cut as many of the images as it could fit on the paper.

I like to leave the paper on the mat until I'm done stamping.  It helps to keep the images secure and not slip around while you're stamping.

I then cut some paper that I had in a paper pack to fit on the front of the card.  I tied some hemp that I had in my supplies and then added the "hello" on top of that.  The finished product turned out like this:

It's a simple card, but very pretty.  I used a CTMH stamp pad called "Moonstruck".  Because I was able to make several images and stamp them all so easily I was able to quickly make a card set of 6 cards.


I'm really enjoying playing with Artiste and Art Philosophy and the coordinating stamps.  I hope you enjoyed this project as well!

Lori

Wednesday, January 2, 2013

Dollar Store Crafting ~ Journal

The inspiration for this project came from THIS post.  I thought this was such a great idea and so quick to make.  I was in Staples one day and saw the notebooks on sale for $1, and I immediately remembered this project, so I picked up a few!  I started with this:


I added scrapbook paper on the front and back, as well as the inside cover.  I glued a ribbon to the inside of the back cover to use as both a place marker and a way to close the journal.

I cut the paper a bit larger than the cover and then adhered the paper down with a Zig glue pen.  I then flipped it over and trimmed off the excess with an Exacto knife.  Next time I make one I will glue the ribbon to the outside of the back cover and THEN put the paper over it!  I'm not sure why I didn't think of that the first time!

The notebook had a weekly schedule printed on the inside front cover, so I used the scraps from the front and back covers and covered that schedule up.

This paper was a double sided paper I had in my stash and the ribbon was something I had in my ribbon rack.  The original pin described dividing the journal up into sections for monthly journaling but I thought I'd just like it better if it were more free-form.

Again, another fast and economical project that you can put together anytime!  I hope you enjoyed this project.  Feel free to leave a comment if you have any questions or just to let me know what you think of this project!

I'd love to know what kind of projects you'd lie to see on this blog!  Please leave me a comment and let me know!

Lori


Monday, December 31, 2012

Goodbye 2012!

Happy New Year's Eve!  I hope that you have enjoyed my posts in 2012 and are looking forward to some new and fun projects in 2013.  If there is something that you're interested in seeing on the blog, please leave a comment and I'll see what I can do!

I don't have a new post for today, but thought it might be fun to reflect on some of MY favorite posts from the past year.  Leave a comment and tell me what some of YOUR favorite projects were!

Imagine Card

Wall Art Using Imagine

Butterfly Wall Hanging

These aren't all of my favorites, but a few!  I hope you take a minute to look over the posts from the past 12 months and leave a comment to let me know which is (are) your favorite!

See you next year!

Lori

Friday, December 28, 2012

Note Card Set

This year I decided to make a personalized note card set for my niece.  I decided to use my Cricut Imagine for this project.  I did a print and cut to get several "K's" for her first name, Katie.  This "K" comes from the Teresa Collins Baby Boutique cartridge.  I then used the Imagine to print the pink paper to use as a background paper.

I used a plain black card stock that I had on hand and then cut the printed pink background paper slightly smaller than the black piece.  I then added some twine.  I used adhesive dots to offset the initial.  Once I had made 6 cards I added envelopes and made a box to present the gift in.  I used Kraft card stock for the box and glued an acetate square to the front so that you can see into the box.

The box was made from a cut in Tags, Bags, Boxes and More that I had resized using my Gypsy until I had it just right for a note card box.  If you'd like the exact measurements just leave a comment telling me what you need!

I liked how it looked but still felt like it needed a little something extra to finish it all off, so I tied the box with black hemp that I had in my supplies.

I really liked how this project turned out.  I think it makes a nice gift for someone and can see myself making more of these in the future.

Again, if you have questions or want specific measurements please just let me know in the comments section and I'll get that information for you.

Lori

Wednesday, December 26, 2012

Dollar Store Crafting ~ Dry Erase List

I've seen a lot of posts on Pinterest lately of simple, quick crafts that looked great. The projects were made with ordinary objects, which got me thinking about starting a segment on this blog of "Dollar Store Crafting". I'm sure I'm not the first person to try this idea, but I thought it would be fun. So, without further ado, my first Dollar Store Crafting project!

If you've been a follower of my blog you may remember the weekly family planner that I made. This uses an 8 opening frame to represent a title and the 7 days of the week. You can write on glass with a dry erase marker and then wipe off.

I saw THIS post on Pinterest and thought it was a fun, quick, economical idea that would be a great gift. I hit a local Dollar Tree and picked up several black frames that were $1 each. I cut regular notebook paper to fit the frame and then added a piece of white cardstock behind the notebook paper.

I tied a dry erase marker (3 pack for $1) to the back of the frame with twine. I added some ribbon to the front (from my stash) and called it a finished project!


This is a fun, easy, quick, and very economical project that is sure to be a hit. I hope you enjoyed my first "Dollar Store Crafting" episode. Check back soon for another great project!

Lori

Tuesday, December 25, 2012

Merry Christmas

Christmas Day is here!  My house is currently occupied with two children who are enjoying the time playing with their new treasures.  My hubby is taking a nap and the dog and I are curled up on the couch, enjoying the Christmas lights and sounds of laughter floating through the house.

Thank you so much for being a reader of my blog!  My gift to my blog followers is that I pledge to provide you lots of crafty inspiration in 2013!  I do, however, ask a small favor in return!  Please become a follower of this blog if you're not already.  And, every now and then, when you see a project that you like, leave a comment!  I love to see comments, even if it's a simple "nice project".

Have a wonderful holiday season.  I hope that you find yourself surrounded by friends, family, and lot of laughter in 2013.  I am thankful for everyone in my life that makes each day fun and crazy!

Lori

Monday, December 24, 2012

More Gift Bags!

Happy Christmas Eve!  I hope that you have a wonderful holiday season with your loved ones.  I've been really busy with holiday crafts and hope that you've enjoyed the posts this month.  I love getting crafty inspiration from blogs, which is why I do this blog...hoping to "pay it forward" and inspire someone else out there.  The best gift to a blogger is to leave a comment, so if you've been reading and like what you've seen, please take a moment to comment!

I'm on a roll with these gift bags!  I love how easy it is to take a plain white gift bag and give it a personal touch.  This time I used Close To My Heart's Artiste cartridge and a coordinating stamp.  I cut a lot of the ornaments and then stamped them while still on the mat.
The stamp colors I used are also from CTMH (Cranberry and New England Ivy).
Then I chose some holdiay cardstock from my stash.  I inked around the edges of the cardstok with New England Ivy.  I cut 3 pieces of twine and inserted them through an eyelet I had put into the top of the bag.  Each ornament was tied to the twine and then adhered to the bag.

I found it better to go ahead and adhere the ornaments down instead of letting them hang.

Fill it with some holiday goodies, add a tag, and you're good to go!

The tag is from My Creative Time, a die called "Stitched Oval Die" which you can find HERE.

Hope you enjoyed this project.  I am really enjoying Artiste and the coordinting stamps.

If you have any questions or more specific instructions, feel free to leave a comment and I'll explain further!

Go be crafty!

Lori

Friday, December 21, 2012

Pencil Jars

I always struggle with what to give the male teachers at my childrens' school.  This year I decided that a personalized pencil jar would be good.  I had picked up these glass jars at the Dollar Store.  I think they're intended to be used as a vase.

To the plain jar I added a ribon at the top.  Since it was for a man I did a plain knot instead of a bow.


To personalize the pencil jar I used my Cricut Imagine and printable vinyl.  This was the first time I had used printable vinyl and I was really happy with how it turned out.

I used the stock images and filled it with the graph paper from "Notebook Doodles".  Then I used "Country Carnival" to get the last name initial of the two teachers.  I decided to change the colors a bit as well.

I did the print and cut.  The package of the printable vinyl suggests putting your blade at 2.  I didn't follow this, but used 3.  Next time I will follow instructions!  Two will be fine.  Setting it at 3 cut through the vinyl and the backing, which wasn't a huge deal.

I applied the graph paper image and then the initial.  Below you see a close up of the decal and initial.  It's a bit difficult to see, but the shape is flood filled with "graph paper" from Notebook Doodles.  (I know I already said that!)

I think these will be a nice gift for the male teachers.  Hopefully they will think so as well!

Go be crafty!

Lori

Wednesday, December 19, 2012

Gift Card Holder

Hello!  I have a quick project for you today for all of those holiday gift cards.  I know people dislike giving them, as they seem so impersonal, but sometimes it's just the best gift for someone!

My Creative Time has a gift card holder die that I used for this project.  This blog has great crafty inspiration as well as amazing products!  You run the die with paper through the Cuttlebug and you have a gift card holder that you can now embellish, stamp, etc.
This is the die, which you can purchase HERE
I decided to make 2 versions of my gift card holder.  I recently purchased a Crop A Dile, so I thought that would be a good thing to test out on this project as well as using some twine.  The beauty of this die is that you can embellish it any way you'd like, with whatever items you have in your stash and it will be awesome!
The die makes 2 slits in the bottom of the panel, and your gift card fits right in there.  Genius, right?
I added tags (also using a die from My Creative Time) to identify the recipient.  I used a Close To My Heart stamp for the "to" and "from".
I hope you enjoyed this project.  Hopefully my gift card holder will make the gift a bit more personal!


Monday, December 17, 2012

Embellished Clothing

I have seen lots of blog posts about people using their Cricut to cut fabric, but I have never done it..until today!  I did it and I am very happy with the results!

I decided to make some embellished outfits for my daughter and neice, who are only 6 months apart.  I picked up some plain pants and shirts at Old Navy.  They were pretty inexpensive and I had a coupon, which made then even moreso!

I chose my images for the shirts.  The flower comes from Art Philosophy and the initial comes from Sesame Street Font.  I did a few test cuts on plain white cardstock to get the best size determined.  A 4" cut seemed to be a perfect size for both the "A" and the flower.

I ironed on Wonder Under to the fabric.  Then I put this fabric on a Cricut mat.  I thought it cut best at higher speed.  I cut more than I needed in case of error.  Overall I think cutting the fabric with the Cricut was good.  I may research a bit and find some tips from people that do it often.

The next step was to iron the appliques to the shirt.  Then it's time to hit the sewing machine.  I appliqued the letter first as it was a bit easier, considering I hadn't used my sewing machine in years.  After I did the letter I sewed coordinating ribbon around the left leg of the pants to give them a little flair!


I did the grey shirt with pink flower second, as the applique sewing was a bit more difficult with the curves.  Then I embellished the leg of the pants.  I thought the shirt needed a little more so I made a bow and attached it with a button.

I am super happy with how these outfits came out!  I'm going to let my daughter have the blue outfit in the morning.  If she wants to wear it then the project is deemed a success!  I think she may be a bit shocked to learn that Mom can sew...she may have more "work" for me!


Update...here she is wearing her "A" outfit!  She liked it a lot!  I see more sewing in my future!


I had forgotten how enjoyable sewing is for me...think back to a hobby or activity that you enjoyed years ago and give it a go again.  You may find yourself pleasantly surprised!

Lori

Friday, December 14, 2012

Shadow Box

One day I received a call from my neighbor, Lori.  "Hey, are you still doing crafts with shadow boxes?" she asked.  Yes, I was, so she told me that she had found several at Goodwill for a buck each.  She said they had a design in them but thought that it would be easy to pop the back out and replace it.  I asked her to go ahead and pick some up for me and I'd see what I could do with them.

I put them aside for a while but recently when I started my Christmas crafting I remembered the boxes.  I unpacked them and found that they had a seashell design on the back panel.  Not very Christmasy, so that was going to have to go!

(I wish I had taken a photo of the "before", but I didn't so just imagine a peachy, seashell thing in the back of the shadow box!!!)

I popped out the back panel and then traced that shape on some chipboard-type stuff I had laying around.  I don't buy chipboard.  I keep the insert in packages to use later.  I cut that shape out and then covered it with scrapbook paper.


Next I added some small jingle bells to the inside space of the shadow box.  I then closed it up.  I thought it could still use a little something extra so I cut some "frosted glass" vinyl and added the word "jingle" to the front of each box.


Now, you don't really notice "jingle" unless you're really looking for it, but I like it.  It casts a shadow on the back of the shadow box, which is kinda cool.

You can really see "jingle" in this one!

Difficult to see in this photo, but "jingle" is on the front glass.
This project was inexpensive, simple, and fairly quick to make.  Most of the time involved was figuring out what I was going to do and how!  Once I had that figured out the actual project itself went really quickly.

Hope you enjoyed todays quick project!

Lori

Wednesday, December 12, 2012

Jazzed Up Gift Bag

I find that I buy a lot of stuff and then don't use it.  I think some may call that hoarding, but not me!  I found a stash of Kraft and white gift bags.  Whenever I want to use one I just hate how "plain" they are, so they sit.

Time to jazz up a gift bag!!!

I cut a piece of decorative red paper to fit nicely on the bag.  I inked around the edges with black ink.  Then using the Cricut Teresa Collins December 25th cartridge, I cut the tree image out at 4".  I added gold Stickles to the star to jazz it up even more!


Then I used the Stitched Oval Die from My Creative Time to cut the sentiment oval out from the leftover paper that I cut the tree from.  I used a Peachy Keen sentiment stamp to stamp "Merry Christmas" on the oval.

Assemble it all together and you have a jazzed up gift bag!  Add some holiday note cards, a fun pen, or even some holiday treats and it's a gift waiting for a new home!

Quick, simple, and using stuff from my stash!  I love it!

Lori

Monday, December 10, 2012

Holiday Wreath - Pinterest Inspired!

I love trolling through Pinterest to find new ideas for crafts, recipes, holiday fun, etc.  When I saw this post I couldn't believe my eyes!  Finally...something to do with all of those extra ornaments, and something BEAUTIFUL at that!

Tip #1...hot glue the caps on the ornaments.  This is seriously a step you don't want to skip.  It doesn't take long and it will save you so much time later, when (if you don't glue them) the caps pop off and you start losing ornaments.

Tip #2...Really shape the hanger into a circle and make sure it's a flat circle.  Mine was not shaped the best and it's seriously not easy to reshape it once you have all those ornaments on there!

You can follow the instructions from the inspiration post so there's no sense in me typing that all out. You're a smart cookie and can follow those instructions just as easily as I did.  It is pretty cool how after you get more and more strung on the hanger the ornaments will start to bunch up and create that beautiful full look that you're wanting.  It happens on it's own and it's like magic!


Add a bow and you have a totally cool, completely beautiful wreath that you made all on your own!  You can use extra ornaments you have in your holiday decorations or hit a dollar store and buy some to use.  I had extras because I used to put up several trees.  I fished out all of the red and gold ones and went for it!

Don't forget my two tips...they'll help you have a beautiful end product!

Apparently our Elf of the Shelf - "Randolph" really liked the wreath also, because this is where we found him this morning!

He looks so happy in there!  I think he has a good view of the living room, dining room, AND kitchen from that spot, so he is able to get lots of material to take back to Santa!  Ha ha!!!

Take some time today to get your craft on!