Freebies!

Bloggin The Crafts currently has 64 followers. I have a goal to get that number to 100 followers! YOU can help me! Refer your friends and fellow crafters. When we get 100 followers there will be a crafty giveaway!
Showing posts with label Cricut Craft Room. Show all posts

Monday, February 6, 2012

Valentine decor

Here's a quick project I made with the Cricut.  I picked up this cute frame at Hobby Lobby.  It was half off, so I think I paid $4 for it.  The silver background paper is leftover from the igloo cards that I made a while ago.  The "LOVE" lettering is from Art Philosophy.  I laid it out in Cricut Craft Room and cut it in black vinyl.  I applied the vinyl to the front of the frame.


Yes....I know what you're thinking.  "Does she seriously decorate her bathroom for Valentine's Day?".  Yes, yes I do.  I know it seems kooky, but that's ok.  I don't decorate it for every holiday, but V-Day is an easy one to do, so I swap out a few things and it's a Valentine kinda mood in the loo.


My blog is going to be seeing a lot more posts than normal.  I'm doing the LOAD class (click HERE for information) so I'm posting a scrapbook page every time I complete one.  Theoretically I should have 29 posts in February since I should have 29 layouts, but I'm not sure if I will be able to keep up the pace.  I'm going to try though.  Then, in addition to the LOAD challenge, I want to keep you informed on my other craftiness happenings, so February will be a big month for the old blog.  I hope you enjoy the constant postings!

Now go and get your craft on!

Wednesday, December 14, 2011

Ornaments

Here’s another crafty gift for you today! I saw blogs and tutorials on making these glitter ornaments so I thought that might be a good gift for school.


I started with clear glass ornaments that I picked up at Hobby Lobby. Add “Glitter It” liquid and coat the inside of the ornament. Dump excess liquid out and let ornament dry a bit. Dump a bunch of glitter into ornament and rotate ornament around to coat inside completely. Dump excess glitter out. Once that dries, tie a bow, replace ornament cap. Voila! Beautiful glitter ornament!


(If you need a video or more details, visit My Pink Stamper for a video tutorial!)


But, the ornament itself is just not enough, right? Heck NO! So I decided to add some vinyl. Since my luck was really good with the tumblers I once again went to the Cricut Craft Room and made my design. Once again, it worked like a charm! I tried 2 designs. One was the letters and numbers in an oval. That did not work well on the round ornament, so I switched to the letters and numbers by themselves and that went on great.


ornament frontornament date


**I know this is redundant, but sorry for the crummy cell phone pics...**


Cute, right? I think so! (Pat, pat, pat….can you hear me patting myself on the back???!!!)


I had a tray of 12 of these already glittered so I put the vinyl on all 12. Now I have 12 personalized gifts that are ready to go!


ornaments


Come on back on Friday to see what I did with these ornaments next! You can’t just hand someone an ornament, right? It’s all about the presentation!


Have a creative day!


Lori

Monday, December 12, 2011

Vinyl–First Project!

Good Monday morning! I woke up at 4 am today, so after getting some work done I thought I'd get blog posts ready for this week. I was busy in the craft room yesterday!


I finally decided to jump in and cut some vinyl with my Cricut. This is ironic because my husband and I own a sign business, so I have lots of vinyl at my disposal. Strange that it took me 2 years to cut vinyl with the Cricut! Anyhoo……


If you’re gonna be a dog, be a big dog, right? So not only did I decide to cut vinyl for the first time, but I decided to use Cricut Craft Room to design my project and then connect to my Expression and cut. "Hopefully it’s going to work" is all I could think!


GREAT news….Using the CCR was really easy. I have used graphic design software before, so some of those shortcuts work in CCR which I love. I wanted to personalize some things for gifts. I decided to try a few tumblers first. I got everything designed in CCR and then decided it was time to take the laptop to the craft room and let ‘er rip!


The first thing that slowed me down was that once I connected the computer to my “E” the computer said the "E" needed to be updated. I have read the horror stories on the Cricut forum, so I was nervous. I followed all instructions and the update went very smoothly. Things were looking good! Then it was time for the first cut. Again, worked like a CHARM! Phew! I had my pressure and speed set at medium and put my blade depth at 3.


Here is what I made!
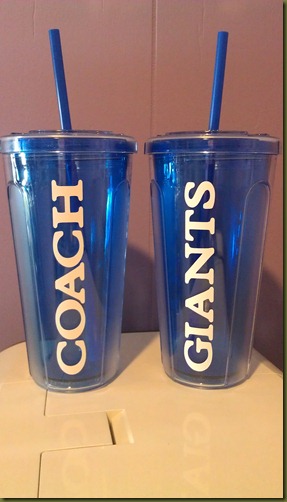


tumblers


I am really happy with how they turned out. I made 3 of these for my son’s basketball coaches. The school colors are royal blue and white. I picked these tumblers up at Wal-Mart for $3 or $4 each. Between my kids’ teachers and coaches and school staff I have a lot of gifts to give, so I wanted to do something nice, yet economical. I am really happy with how this turned out.


tumbler


You can see in this photo that I have “Coach” and “Giants” on each tumbler. Not too shabby for my first run with CCR and vinyl! Right now I am pleased as punch that I have easy access to vinyl in all colors!


**Again, I apologize for the crummy photos. I am still using my cell phone. "Get the camera working and light box ready" are on my "To-Do" list for this week!


Have a great day…go and do something creative!


Lori